Hi, guys! It is tag time again! I am participating in the Tim Holtz 12 Tags of 2013. I had such a blast participating last year and even was a winner in December. My friend Ruth loves my tags. She has asked that I make them for her, so when I can, I will be making two each month and will be giving one to her.
I am very happy with how they turned out. Distress inks and Distress stains (even the metallics) were used. I didn't have the cute finger stamp Tim used, so I decided to use various arrows on mine. Being the klutzy person I am, I was hesitant to cut my embossing folder as instructed. Now, I know X-Acto knives and myself do not play nice together. My late hubby used to hide them from me. I didn't cut myself, but I did cut my folder completely in half instead of just enough to insert the tag. I was able to do this to another of my folders with no incident, but not this time. Packing tape came in handy to mend it.
If you would like to learn some cool techniques and have a lot of fun, I would highly recommend you take part. I can't wait to see what Tim comes up with for February!
Until next time!
Thursday, January 31, 2013
Wednesday, January 30, 2013
WOYWW - My First Submission
Hi, guys! Short post today. I decided to join in at WOYWW and show you what is on my desk. This is a feature done on Wednesday and everyone shares what they are working on with a snap shot of their work space.
Tonight I am working on my January Tag for the 12 Tags of 2013 by Tim Holtz. You can see the desk is loaded with distress inks, stains and various other goodies. My hands look extremely inky to say the least!
I am asked often what my desk looks like when I am creating things. Now you know!
Until next time!
Tonight I am working on my January Tag for the 12 Tags of 2013 by Tim Holtz. You can see the desk is loaded with distress inks, stains and various other goodies. My hands look extremely inky to say the least!
I am asked often what my desk looks like when I am creating things. Now you know!
Until next time!
Tuesday, January 29, 2013
Butterfly Wishes for a Happy Valentine's Day
Hi, guys! Today I am sharing a Valentine I made. My friend Chris asked me to make her a Valentine for her granddaughter. She wanted it to have her name on it, as the girl loves seeing her name show up on cards. After thinking about it for awhile, I decided to use an stamp from a Valentine set from Stampin' Up from awhile back. I thought these butterflies would be fun for a girl and I added bling and popped up the wings as well. I put Deanera's name in a butterfly to personalize the card.
Supplies:
Stamps: Stampin' Up
Paper: Papertrey Ink, Stampin' Up, Authentique
Ink: Archival Black, Distress Ink
Misc.: Gems, Martha Stewart Butterfly Punch, Prisma Colored Pencils, Gamsol
Valentines are so much fun for me to make. I love that you can express yourself in so many ways. It really makes me happy when someone chooses to have me create a card for such a special day.
Hope you have a great one!
Supplies:
Stamps: Stampin' Up
Paper: Papertrey Ink, Stampin' Up, Authentique
Ink: Archival Black, Distress Ink
Misc.: Gems, Martha Stewart Butterfly Punch, Prisma Colored Pencils, Gamsol
Valentines are so much fun for me to make. I love that you can express yourself in so many ways. It really makes me happy when someone chooses to have me create a card for such a special day.
Hope you have a great one!
Monday, January 28, 2013
Two Hearts Entwined
Hi, guys! Hope your weekend was a good one. I can't believe it is over so fast! I am looking forward to next weekend as I made it a three-day weekend. Next Saturday is my husband's monthly show, and Sunday is the Super Bowl. I will need an extra day off for sure.
For today, I thought I would share a wedding card I made. My friend Christine asked me to make a personalized wedding card for her to give. I embossed the card and then heat embossed the focal image. I wanted to tie polka dots in throughout the card.
Supplies:
Paper: Stampin' Up
Ink: Versamark, Distress Ink (Peeled Paint)
Stamps: Stampin' Up
Misc.:Ranger Gold Embossing Powder, Cuttlebug Embossing Folder, Gold Cord, Mini Rectangle Scallop Punch, Pop Dots
I wish the happy couple many years of happiness!
Until next time!
For today, I thought I would share a wedding card I made. My friend Christine asked me to make a personalized wedding card for her to give. I embossed the card and then heat embossed the focal image. I wanted to tie polka dots in throughout the card.
Supplies:
Paper: Stampin' Up
Ink: Versamark, Distress Ink (Peeled Paint)
Stamps: Stampin' Up
Misc.:Ranger Gold Embossing Powder, Cuttlebug Embossing Folder, Gold Cord, Mini Rectangle Scallop Punch, Pop Dots
I wish the happy couple many years of happiness!
Until next time!
Saturday, January 26, 2013
On Top of Spaghetti (Nope, Penne!)
Hi, guys! Thought I would share a find with you today. My husband and I LOVE meatballs. It is a shared love, and I still haven't perfected my mother's recipe. But, luckily, I have discovered a great recipe by a family located here on Long Island. They were featured on Bobby Flay's Throwdown Show, and I figured if they can beat Bobby, I would try them. Oh my word! They are delicious and easy. The Maroni family recipe was a hit with my husband as well. The problem for me is that he cannot have tomatoes. He is allergic, and so I can't simmer them all in a pot of sauce. I take the batch and divide it and put mine in sauce and leave his plain (I get the better end of this deal!). They are very moist, so he doesn't mind them not being in a sauce. I normally serve his with the pasta on the side sauced with pesto, alfredo, or butter and cheese.
I have NOT made their sauce yet, so I can't comment on it yet. I have so many sauce recipes I keep trying them out and having fun. This weekend I made a sauce from Stanley Tucci (yes, the great actor)'s cookbook. It is a new book for me, and it is a fun one. I made the recipe for Joan's Basic Sauce and it was so delicious and not a large batch. I found the addition of a tablespoon of bell pepper to be an amazing touch. You don't taste "pepper" but it gives it a nice taste.
Off to get my fingers inky, and hopefully have some fun stuff to share with you soon!
Until next time!
I have NOT made their sauce yet, so I can't comment on it yet. I have so many sauce recipes I keep trying them out and having fun. This weekend I made a sauce from Stanley Tucci (yes, the great actor)'s cookbook. It is a new book for me, and it is a fun one. I made the recipe for Joan's Basic Sauce and it was so delicious and not a large batch. I found the addition of a tablespoon of bell pepper to be an amazing touch. You don't taste "pepper" but it gives it a nice taste.
Off to get my fingers inky, and hopefully have some fun stuff to share with you soon!
Until next time!
Thursday, January 24, 2013
House Mouse Valentine
Hi, guys! Hope this finds you warm and toasty indoors as we have been in a deep freeze here in NY this week. It doesn't look like it will ease up until next week, so I am spending more time inside with my supplies and plenty of hot tea! I want to take a minute before I share the card today to thank you for all the visits and kind comments about my stamp room. It was fun sharing it with you and I hope some of the information was helpful.
One of my crafty resolutions this year was to participate in challenges and be more active in the blogging community. I haven't been blogging a year yet, so I am cutting myself some slack. So, I decided to start with my first entry today. Simon Says Stamp is holding a challenge "What are you known for?" I found the question a great one as I am often asked what my "style" is, or, what do I like to make the most? I am a card maker at heart. If I had to say what others know me for, I would say personalized cards for various holidays and often sweet, cute or punny sayings, and at the other end of the spectrum, distressed or Vintage images. I love all different types, but these are the most often requested. My mom pointed out to me a few months ago that I use a lot of "mice" in my cards. It turned out she was noticing my House Mouse cards. I have acquired a large collection of these guys and they are the first ones my nieces go to when they stamp with me.
For my entry in the challenge I am submitting this card. It is a Valentine I made for a fellow blogger to give to her husband. She noticed my House Mouse stamps and said she would like a Valentine using them. I used my Prisma color pencils with gamsol to color the image. It is a large stamp, so not much more needed to be used on the card.
Supplies:
Stamps: House Mouse, CC Rubber Stamps
Paper: Stampin' Up
Ink: Archival Black, Stampin' Up
Misc.: Prisma color pencils, Gamsol, Corner Rounder, Stampin' Up Label Punch, Ribbon
Aren't these guys adorable? I sure hope Bee's hubby likes this Valentine!
Until next time!
One of my crafty resolutions this year was to participate in challenges and be more active in the blogging community. I haven't been blogging a year yet, so I am cutting myself some slack. So, I decided to start with my first entry today. Simon Says Stamp is holding a challenge "What are you known for?" I found the question a great one as I am often asked what my "style" is, or, what do I like to make the most? I am a card maker at heart. If I had to say what others know me for, I would say personalized cards for various holidays and often sweet, cute or punny sayings, and at the other end of the spectrum, distressed or Vintage images. I love all different types, but these are the most often requested. My mom pointed out to me a few months ago that I use a lot of "mice" in my cards. It turned out she was noticing my House Mouse cards. I have acquired a large collection of these guys and they are the first ones my nieces go to when they stamp with me.
For my entry in the challenge I am submitting this card. It is a Valentine I made for a fellow blogger to give to her husband. She noticed my House Mouse stamps and said she would like a Valentine using them. I used my Prisma color pencils with gamsol to color the image. It is a large stamp, so not much more needed to be used on the card.
Supplies:
Stamps: House Mouse, CC Rubber Stamps
Paper: Stampin' Up
Ink: Archival Black, Stampin' Up
Misc.: Prisma color pencils, Gamsol, Corner Rounder, Stampin' Up Label Punch, Ribbon
Aren't these guys adorable? I sure hope Bee's hubby likes this Valentine!
Until next time!
Monday, January 21, 2013
My Stamp Room is Finished!
Hi, guys! Hope you had a nice weekend. I am so happy to say that my stamp room is now complete! It has been a project that my husband and I have been working on since the spring. I thought I would share how it has turned out. What I love most about this room is that there is a place for everything and I was able to arrange my supplies in a way that I can easily find what I am looking for.
The desk was from Ikea. We had a glass top made to protect it from inks and paints (and me!).
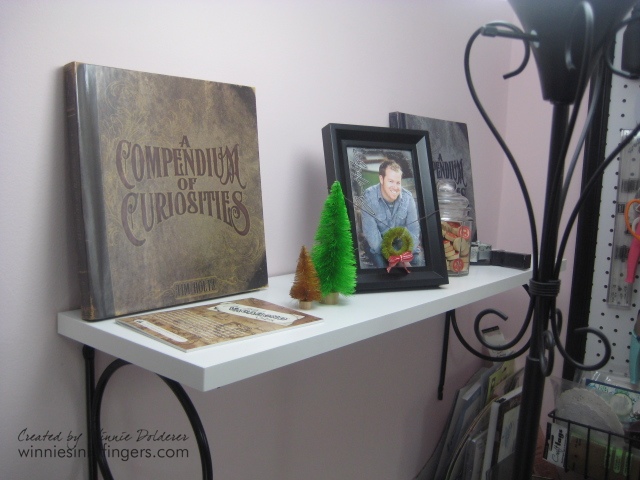
My Tim Holtz shelf my husband put up so I could keep his books out to inspire me.
My husband was able to snag two sets of patent drawers from his office that were going to be tossed out. The metal drawers are sturdy and shallow which makes finding stamps very easy. The stamps are sorted by type and/or stamp company. Finding stamps has never been easier for me.
Distress Inks, anyone? This is how I store mine. The shelf is lined with brown paper and the pads are laid out on top. This cabinet is from Ikea as well.
I keep my various punches in a couple of the drawers as well.
The use of Billy bookshelves (Ikea again) along the wall made it easy for me to lay out the supplies.
I really love the use of lazy susans on the bookshelves to arrange my paints, sprays, stains and various powders. It cuts down on the "searching" for a specific item, and leaves more time for creating.
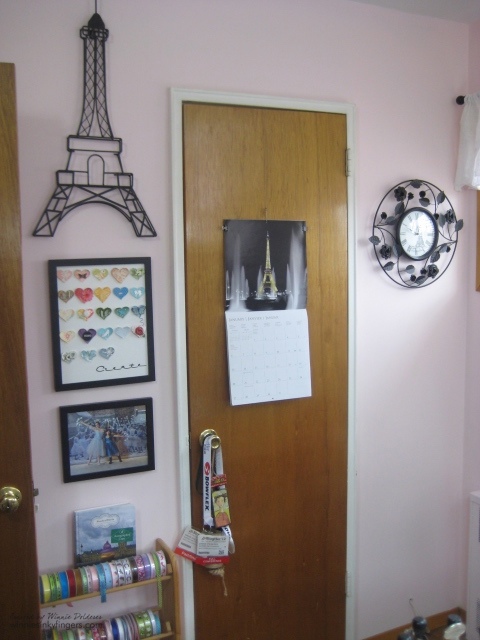
I surrounded myself with images of Paris. I have always been so fond of Paris; even as a little girl I would dream of going there. So when I was fortunate enough to go there, I was officially hooked. My husband is happy that I have now have a place where all my Paris stuff can reside (I don't know why he doesn't love the Eiffel Tower).
My hubby was so helpful by making labels for all my binders and drawers. I decided to use mini binders to store my embossing folders and my Tim Holtz stamps.
Every stamp room needs some aprons!
Last but not least, here is my roomwarming gift that my husband gave me. It has been a blessing as I am very short and I am able to pull things from all the shelves and even from the top of the bookcases. I love this step stool as it is on wheels but they lock down when you step on it. For someone like myself, who is known to be clumsy, it is safe.
I have a few pieces of advice if you are going to make a stamp or craft room. Make sure you measure, and then measure at least two more times before you look for furniture. It will keep you from buying things that will not fit in your room. My husband kept an eye on this for me and so everything fit together like a dream. Surround yourself with what inspires you and makes you happy. Think about how you work, and plan to re-organize your supplies a few times until they will be in the perfect spot for you. Make sure you have good lighting.
I am a lucky lady, as my husband worked so hard to make this room a reality for me. Painting the room and assembling all the furniture was such a big job. All the details he added by labeling, hanging artwork, etc. has made the room so comfortable and a pleasure to work in.
Hope you enjoyed the tour of the room! If you have any questions, just ask.
*Added 7/4/2013: My Distress Markers are now located on my "Tim Shelf" with his books - laying down. He mentioned that they should be stored that way to keep the ink in both ends equally distributed. Thank you to Belinda for reminder!
Until next time!
The desk was from Ikea. We had a glass top made to protect it from inks and paints (and me!).
My Tim Holtz shelf my husband put up so I could keep his books out to inspire me.
My husband was able to snag two sets of patent drawers from his office that were going to be tossed out. The metal drawers are sturdy and shallow which makes finding stamps very easy. The stamps are sorted by type and/or stamp company. Finding stamps has never been easier for me.
Distress Inks, anyone? This is how I store mine. The shelf is lined with brown paper and the pads are laid out on top. This cabinet is from Ikea as well.
I keep my various punches in a couple of the drawers as well.
The use of Billy bookshelves (Ikea again) along the wall made it easy for me to lay out the supplies.
I really love the use of lazy susans on the bookshelves to arrange my paints, sprays, stains and various powders. It cuts down on the "searching" for a specific item, and leaves more time for creating.
I surrounded myself with images of Paris. I have always been so fond of Paris; even as a little girl I would dream of going there. So when I was fortunate enough to go there, I was officially hooked. My husband is happy that I have now have a place where all my Paris stuff can reside (I don't know why he doesn't love the Eiffel Tower).
My hubby was so helpful by making labels for all my binders and drawers. I decided to use mini binders to store my embossing folders and my Tim Holtz stamps.
We used an Ikea CD tower for housing my acrylic stamps that are kept in CD cases. I noticed that my Tim Holtz steel rule dies also fit great and it is an easy way to keep them orderly as well.
Every stamp room needs some aprons!
Love my Ott Light on the desk!
My tool chest which houses all my Tim Holtz embellishments. It is a good way to find all the goodies without too much digging around. I love all his metal embellishments and before I was keeping them in jars and it was time consuming to locate any specific thing.
My chalkboard is fun for me. I love to make notes to myself as well as reminders.
I have a few pieces of advice if you are going to make a stamp or craft room. Make sure you measure, and then measure at least two more times before you look for furniture. It will keep you from buying things that will not fit in your room. My husband kept an eye on this for me and so everything fit together like a dream. Surround yourself with what inspires you and makes you happy. Think about how you work, and plan to re-organize your supplies a few times until they will be in the perfect spot for you. Make sure you have good lighting.
I am a lucky lady, as my husband worked so hard to make this room a reality for me. Painting the room and assembling all the furniture was such a big job. All the details he added by labeling, hanging artwork, etc. has made the room so comfortable and a pleasure to work in.
Hope you enjoyed the tour of the room! If you have any questions, just ask.
*Added 7/4/2013: My Distress Markers are now located on my "Tim Shelf" with his books - laying down. He mentioned that they should be stored that way to keep the ink in both ends equally distributed. Thank you to Belinda for reminder!
Until next time!
Subscribe to:
Posts (Atom)